Tuesday, March 29, 2011

Where the Seed Meets the Soil

Ah, the romance of seed starting.


That idyllic union of tiny-packet-of-life and moist-brown-planting-medium.

It’s so basic, so pure, so elemental.  So why did this hallowed task elicit so much groaning, such tortured gasping, so much banging of my head against the kitchen counter?

In a word: overambition.

In four words:  Seventy-two  $%!#  planting pellets.

What’s the big deal?  Well, nothing if you only have a few of them. See?

Innocent. Harmless. Cute, even.

But multiply those little organic oreos by 72, and you have a migraine in the making.

Yes, those cute little dried peat hockey pucks -- that expand with water to make a fluffy seed bed-- were the bane of my existence for an entire afternoon.

Everything started out just fine. I had my 72 pellets snuggled in their tray, I had my pitcher of water, and I started to pour.


No problem. Within seconds they started to expand before my eyes, which was oddly mesmerizing.

I don’t know how to explain what happened next. I was like a three-year-old squeezing a bottle of glue. I just couldn’t stop. Even when they began to get really fluffy like this:


I thought, just a little more water couldn’t hurt (‘cause maybe they’d get even Bigger!!).  A person who pays attention to detail, a person who plans ahead, would have noticed the instructions on the package that read “add approximately 10 ½ cups to expand the whole package.”

Too late. By the time I was done with my giant blue pitcher, my soil looked less like a moist planting medium, and more like Hungarian goulash.


Despite evidence to the contrary, I’m actually a good enough gardener to know that this is not a happy place for a seed. Glistening is not good. I learned this lesson the painful way, which you can read a bit about here.

Now I was faced with a dilemma: I could wait hours, probably many hours, for these pellets to dry a bit. Or I could squeeze them out into the sink, one by one, like the sopping little sponges they were.  Since I’m as lacking in patience as I am in foresight, you can probably guess what I did next.


Squeeze away I did. And, I did it Seventy-two times. Seventy-two times. It took me half an hour. It’s a good thing I don’t have arthritis.

The pellets looked so much better afterward.


But the kitchen sink didn’t. 


The sight of it would have left my husband imploring:  why do we have a utility sink in the laundry room if not for the squeezing of dirty soil pellets? I hear you, sweetie, but the lighting in the laundry room is not conducive to taking nice photos. And look! Clean up was but the work of a moment:


‘Course the other side of the sink was a different story….


But back to seed starting.

The next step was to fluff the peat to make some nice healthy air pockets on the soil for our seeds.


Readers who know me are no doubt making a mental note: Never use the small forks at the Mills’ house.

Once my pellets were properly squeezed and fluffed,


I thought I was home free! Now I could start the fun part: planting my carefully selected seeds!

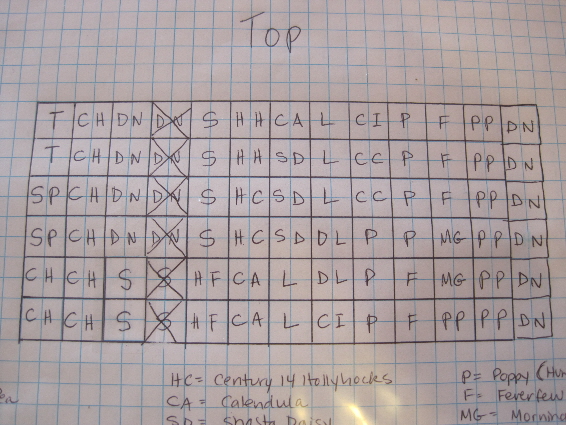
So, to solve the problem of remembering which seeds were planted where, I had already drawn up a grid with 72 squares and an accompanying legend.


My list of prospects included tomato, sweet pea, chives, sunflower, hollyhocks, daisy, dill, lettuce, poppies, cilantro and a few others.
A thing of beauty, right? And here I was a few paragraphs back complaining that I don’t plan ahead. I mean, this grid should have gotten me some major points for foresight. It should have seen me through my planting process with ease.

It didn’t.

Starting in the top left hand corner, I carefully placed three tomato seeds like so…


…and pressed them into the soil. Following my grid, I did the same with the pellet directly underneath the first one, since I planned to proceed in vertical columns. Next, it was time for sweet peas. Sweet peas? Where were my sweet peas? I couldn’t find those seeds anywhere. A quick glance around my kitchen reminded me that I’d left them to soak in glasses the night before, along with Cardinal Climber vine and Morning Glory.


See that? More points for Bel in the planning and foresight department! Certain larger, harder seeds need to be soaked ahead of sowing (it always tells you which on the packets) and sweet peas are among them. Now those seeds were swollen and ready to go.

So back to my tray I went. And this is where my plans began to unravel, again. I was just tucking my darling sweet peas in when I realized, with a gasp of horror, that I’d  poked them into the same pellet I’d put tomato seeds in a minute before. There were now five seeds in one pellet: three tomato seeds (probably shoved way down deep) and two sweet pea seeds.

Here’s the problem:  once you put seeds in a pellet and cover them with dirt, that pellet looks exactly like all 71 other pellets.

Now, maybe you  are a visually gifted person who can glance away from a grid of 72 brown circles, perform a separate task (in my case pick up more seeds), and look back to find EXACTLY where you left off, but I couldn’t do it. My attention deficit issues leave me completely unequipped for the task. So after digging up the sweet pea seeds, planting new tomato seeds (since I didn’t know how badly I’d disturbed my original tomato seeds) I came up with a solution:


(No small forks at the Mills’ House, no corn on the cob).

I placed the corn-on-the-cob holder in the pellet just underneath the one I was currently planting. Again, since I was proceeding from top to bottom in vertical columns, I knew when I looked away to grab more seeds, the corn holder would tell me in which pellet to put those seeds. Then I’d move the mini corn down, and so on, and so forth.

Unfortunately, even this genius system failed. 


Here I was at the top of column five from the left, and when I looked back at my planting grid and realized I was supposed to be at the top of column six.


I'D SKIPPED AN ENTIRE COLUMN! 

AYGGGODDSHYAMOTHFRACK!   AGH!  It took me a long, long time staring at my genius grid (and digging up a few choice seeds) to figure out which column I’d skipped.

And I was no longer having fun with this seed sowing business. To say I was yearning for the days when I planted 10 or 15 peat pots and called it a day would be an obscene understatement. The groaning was starting in earnest now, as well as a variety of frantic thoughts: “Crap! I have to pick up the boys up from school in an hour!” and “What the hell am I going to make for dinner?” and, of course “Whose lousy idea was it to plant 72 pellets and write a blog post about it?”

Next year, friends, we are going to do this differently. Forget the genius grid. I think the only way to plant 72 pellets (and please, please leave me helpful comments if you know better) is to put color coded toothpicks in each one as you go. And no grid. Because if there is no grid, then there is none of this skipping of columns business. And no tedious editing of the grid to avoid drawing up a brand new one:


And please, whatever you do, do not point out that the row I crossed out does not match the one I added on the far right. To explain that would be too painful for me, and too boring for you. Suffice it to say, this is where the head banging on the counter began.

Yes, toothpicks, I believe, will reduce the madness of the whole process significantly. And to end the suspense, I did finish planting in time to pick up my kids from school. And I did figure out dinner (brown rice, black beans and chicken if you must know).

Here I am spritzing the finished pellets. You love the green spritzer, right?


I love the green spritzer. I do. In fact, it almost brought back the romance. But not quite.

In the end, my neck was sore, my back ached, and my eyes were shot with red. The only thought flooding my pained brain was “there went two hours I’ll never get back.” I know, I know: What happened to my unflappable gardener spirit? It got squeezed out like so much dirty water from a soggy seed pellet. But I’ll be back to plant another day. Stick with me for the magic that will certainly happen when my lovingly  newly planted pellets meet my new light system!


Thursday, March 24, 2011

Let There be Light

After my (excessively) long and (overly) impassioned post extolling the virtues of fluorescent lights for seed starting, I only had one thing left to do: assemble my new lighting system.

Fortunately, this was not a difficult task. Though my failure at a simple mechanical assembly would have made for an interesting blog post, the truth is, it was easy enough for a five-year-old to do.


Right Ben?


Ben?

 
Okay, two five-year-olds, then:

Show us your work, boys! 


(And yes, I know Ben has serious bedhead, but we’re keeping it real...)

After the legs were done-- which only required one screw and two washers each-- attaching the top bar was a simple matter of lowering the square shaped compartments in the top bar down onto the square shaped legs. Voila!


Now, notice the silver rings hanging down from the bar, because they’re going to come into play in a minute. But first I had to snap two metal clips onto the back of the fluorescent bar between the painted arrows like this:


Then I slipped those silver rings hanging from the top bar onto the metal-clip hooks like this:

And I was in business!

The light definitely came out a little cattywampus, but it was easy to straighten by fiddling with the middle lanyard and toggle at the top.


This feature is really the key to the whole contraption, since moving that toggle up and down the central cord is what lets you raise and lower the light. That's how I'll get the flourescent right down on top of my little seedlings once they poke through the soil, and then I can move it up as they grow.

Now, of course, I still needed to turn it on. All I had to do was insert this plug….

…into the socket on one end of the fluorescent rod:

AND.......

(You could start humming the tune of “This Little Light of Mine” for full effect)

TA DA!!!!


There you have it, folks!  Is that exciting or what?!  I mean, who needs cable, right?

Now, although lighting up my carpet was pretty exciting, I had to immediately grab my seed tray so I could really start fantasizing…

YES! 
Come on, now, your heart’s racing a little, right? 
No?
Well wait till you see when I put the top on the right way:

AWESOME! 
Right?
Not doing it for you, huh?

Okay, well, my kids loved it.  But mainly because of that fun switch you can see on the cord in the picture. And also because the boxes that came with the kit made a GREAT HotWheels tunnel.

See, isn’t gardening fun?

Next post: “Seeds, meet my good friend Soil.”

Saturday, March 19, 2011

I Said You Wanna Be Startin' Somethin'?

First, a little mood music....


That's more like it.

So what are we starting exactly? Well, seeds, of course. And seed starting, for gardeners, is sort of like the rock star equivalent of going on a live tour. It’s how you prove you’re the real deal.

In a way, it’s the culmination of a three-stage evolution that starts when you buy your first house plant. Stage 1: Can I bring a thriving, mature specimen into my home and not kill it?  Stage 2: Can I buy a small plant, and nurture it into adulthood? And finally, Stage 3: Can I coax life from a dry, brown nub?

After many gardening successes, I still find myself intimidated by starting seeds. And, well, it’s with some trepidation I admit I’ve really only succeeded, um, once. And it was probably beginner’s luck. My first time out I was so outrageously successful, I ended up with a bathtub full of green thriving things that needed regular trimming while I waited for planting time.

My second year I got nothing. And I mean Nothing. Nada. Niente dahling. I suspect overwatering. All I know is that after two weeks of coddling, I had nothing to show for it but lots and lots of little pots of dirt. When I finally, frantically, dug into the pots I found no trace of seeds. My guess is they rotted and became one with the earth I planted them in.

My third year….well…..what can I say about my third year? I cheated. Unable to tolerate a repeat of the previous year’s disappointment, I germinated my seeds preschool-style (in a ziplock bag, with a wet paper towel) and only tucked those suckers into pots once I knew they were a sure thing.

Truth is, sometimes the leap of faith involved in burying seeds, spritzing them, loving them, and perching them day after day on a sunny windowsill is just too much to bear.   Or perhaps, I just need an elaborate excuse for what I’m about to do this year. This year, I’m bringing in the big guns. I’m getting techy, baby.  We’re talking state-of-the-art; we’re talking science.  Have a look:


Not impressed?

Just a giant Tupperware filled with Christmas lights, you say? Say hello to my new, heated seed germinating mat. This is an idea floated by a fellow reader of Fine Gardening Magazine. The mat supposedly offers the consistent, gentle warmth that seeds adore, as opposed to the wild temperature fluctuations inherent in the sunny-windowsill-by-day-but-frigid-house-by-night setup. I know heating mats usually look more like this:

But they also usually run in the neighborhood of $25, and don’t you adore any gadget you can make with stuff you have lying around the house? The reader sending in the Christmas light suggestion swore this contraption got her tomatoes from seed to seedling in two days, instead of the typical five to ten days. So we’ll test it out ourselves, right here, with pictures to prove it. But that’s not all. When I said I was getting techy, I sort of meant it. Here is the latest, non-homemade, addition to my seed starting arsenal:


A lovely, lovely grow light set up. Yes, it’s still in the box and needs to be assembled, but I’m already in love. And really, what’s not to love? It’s somewhat industrial, yes. And not nearly as romantic as the windowsill. Agreed.  But I’m going to be able to lower that fluorescent rod to within inches of my little green prospects.

Why would I want to do that? Because, overwatering notwithstanding, lack of light is the factor that foils most seed starting endeavors. I know plenty of gardeners who swear by their windowsill, but unless yours faces due south, you simply won't get enough intense light for your plants. And you’ll likely end up with something like the tomato seedlings in this photo, posted by another gardener on flickr:

 
Let’s coin a phrase and call this the Supermodel Seedling Syndrome. Though it’s tempting to get excited about seedlings that look this way (“But they’re so tall !”) this much leg on a plant is never a good sign. Like Supermodels, these starts are starving. Light is food to your seedlings, and these ones are stretching so hard to get more of it, they are centimeters away from flopping, literally and figuratively.  In other words, what’s good for Christy Turlington is not good for tomatoes. We want stocky. Think short and stout. Something along the lines of Danny DeVito is a great look on a seedling.  Like the tomatoes in this photo by fellow gardener Joel Ignacio.

 
How do you get seedlings like this? Lots and lots of light. More light, really, than can be provided by the windowsill. Plants love flourescents, and they love having them up close and personal. As close as four inches from their leaves isn't unheard of. That's where my new grow light system, which has a light that can be lowered, comes in.

With plenty light, seedlings like the ones above will have true leaves by the time they develop more stem, and will look like these tomatoes grown by Austin gardener Renee Studebaker:


It’s no wonder these little tomatoes have a Twist And Shout look about them. They are absolutely doing the happy dance. Notice the thick, brownish/green stems, compared the anemic white ones on our Supermodels. The seedlings above, by the way, were documented on a garden blog called Renee's Roots, and grown on a set-up that looked like this:


Totally industrial, right? Completely lacking in Romance. But did it work? You bet. Here’s hoping my new gardening contraptions bring me some rock-star seedling success this year. I’ll keep you posted.

Ma Ma Se Ma Ma Sa Ma Ma Coo Sa , Ma Ma Se Ma Ma Sa Ma Ma Coo Sa……

P.S. To clear up some reader confusion, heated seed starting mats, whether the store bought or Christmas light variety, will speed up germination, but will not prevent leggy seedlings. For stout seedlings, provide ample light, preferably flourescent, and ideally as close to four inches away from the leaves. Also, though heated mats certainly speed up germination, they are not necessary, and seeds will germinate without them. Sunny windowsills (after I spent so much time bashing them) work great for germination, as long as you remove your pots at night so they don't get too cold.

Thursday, March 17, 2011

Living with the Sticks

I can’t be the first person to receive the amazing offer in the mail from the Arbor Day Foundation:  Join our organization, they tell you, and we will send you not one, not five, but-- count them-- 10 trees. Ten trees.

I admit, I didn’t have the vaguest idea what I would do with 10 trees. I mean, I love trees. I  love trees. But we don’t have an acre of land to play with, here. We have a fairly small lot on which we had already planted seven carefully-selected baby trees.

So I didn’t need 10 trees. But still. The thought of 10 trees, leafy and glorious, arriving on my doorstep was, to say the least, mildly exhilarating. I imagined the UPS truck pulling up to my curb, and one container after another being unloaded onto my driveway. The ADF promised dogwoods, redbuds, crape myrtles. The pictures in the brochure looked a lot like this photo from their website:


I mean, come ON. I couldn’t resist.

Without mentioning it to my husband (who abhors all clutter, garden-type and otherwise) I sent in my membership money with carefully concealed glee. After all, I could figure out what to do with my beautiful specimens once they arrived. So I waited. 

After a long period of time-- so long I had forgotten about the promised trees-- a small package arrived in the mail from the ADF. When I saw it, I figured it was some kind of teaser to keep me happy until my trees arrived. A way of saying “your membership is important to us, please continue to hold.”  I knew it couldn’t be my 10 trees. After all, how many trees could fit inside a plastic bag about twice the size of a Sunday paper?

Ten, it turns out. Ten trees.  Each one a spindly stick with a tiny, tangled shock of roots on the end. They lay in the bag like tiny abandoned children, naked and obscene, with moist polymer gel clinging to their pathetic little forms.

I admit, I felt like a fool. Where were the leaves? Okay, it was November, I could deal with no leaves, but where were the BRANCHES for pete’s sake? And how was I to know which was which?

Fortunately, each stick (and that’s really too big a word) was marked with a bit of colored paint: purple for the Sargent Crabapple, white for the Eastern Redbud, and so on. So I identified each of my poor orphans. And then I did what any concerned but overwhelmed parent would do: I gave half of my trees to my green-thumb neighbor, Duke.

Now, before you judge me, let me say on my behalf that Duke has some plant prowess that leaves me in awe. I gave these babies a great home. The man has houseplants at least 14 feet tall. And they started out regular-sized, like the ones the rest of us have. That being said, I admit I felt like a wreckless hussy who wanted her fun but didn’t want to live with the consequences.

But I wasn’t completely off the hook. I still had to decide what to do with my five trees. Well, call me she-of-little-faith, but I just couldn’t devote a single square foot of prime, heavily amended garden soil to my new charges. Besides the fact that I didn’t have enough room for their mature forms, I didn’t believe-- regardless of what the Arbor Day Foundation literature promised-- that these babies had a chance. After all, the ADF hadn’t proved themselves terribly trustworthy in the we-can-live-up-to-expectations department. So I opted for pots:


No, the trees are in there, I swear. I moved them into the garage shortly after shooting this photo, and they’ve lived there ever since. I have watered them maybe twice. Like I said, I wasn’t expecting much. Then today I gave them a little more than the usual cursory glance, and I couldn’t believe my eyes.


Yes, folks. That is my Sargent Crabapple. I feel like a new parent seeing a fetus kicking on the ultrasound for the first time. Like, hot-diggity-dog! There’s life in their after all!  Suddenly I’m rooting for the other four. Come on you little whippersnappers!  You can do it!  I’ll keep you updated…